Connecting TeraVault to LiveWire PowerCore
The storage capacity of any LiveWire PowerCore with 200 TB, RAID 6 (240 TB, optional RAID 0) of total hard disk capacity can be increased through the addition of TeraVault for LiveWire PowerCore. TeraVault is available in a configuration of 200 TB, RAID 6 (240 TB, optional RAID 0). Up to four TeraVault units can be added for a total of up to 1000 TB, RAID 6 (1200 TB, optional RAID 0). If you purchased TeraVault with your LiveWire PowerCore, the instructions to connect it to your LiveWire PowerCore are provided below.
To connect TeraVault to LiveWire PowerCore:
1. Make sure both TeraVault and LiveWire PowerCore are powered OFF.
2. Select a suitable location for both TeraVault and LiveWire PowerCore. Both units can be installed on a flat surface, or mounted in a standard 19-inch equipment rack.
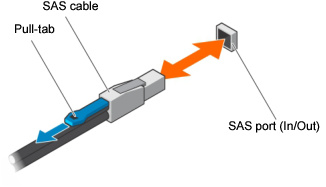
3. Run the SAS external cascading cable between the units so that the cable is not kinked, bent, or twisted. The SAS external cascading cable is included with TeraVault.
NOTE: If you have multiple TeraVault boxes, and the system is disconnected for any reason, the cabling of the boxes needs to be exactly as it was before, otherwise the RAID won’t be seen correctly. To assist you with the cabling, every TeraVault box is labeled with a number, and every TeraVault cable is labeled to the exact port it needs to get plugged into. See Connecting multiple TeraVault units.
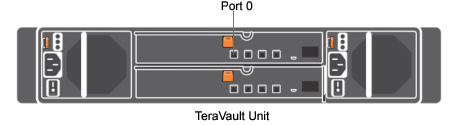
4. Facing the rear of LiveWire PowerCore, insert one connector of the SAS external cascading cable into the left RAID port (Port 0) of the RAID controller on LiveWire PowerCore so that the release pull-tab is on the top.
NOTE: It may be necessary to remove the handle on the rear of the appliance in order to connect the SAS external cascading cable into the left RAID port of the RAID controller.
5. Facing the rear of TeraVault, insert the other end of the SAS external cascading cable into the RAID port (Port 0) of the RAID controller on TeraVault so that the release pull-tab is on the top.
NOTE: Be certain the connectors are installed completely as it can look and feel as if the cable is secured without actually making a connection. Give the connector body a tug, then push it in again to be sure.
6. Turn on power to TeraVault by pressing the power button on the front of the chassis. You may see brief bursts of LED activity as the expander in TeraVault scans the drives.
7. Turn on the power to LiveWire PowerCore. The system is ready for use as soon as the LiveWire PowerCore boot sequence completes.